Here’s the equipment I used, this should work similarly on other software versions:
Synology NAS Running DSM 7.0
Raspberry Pi running Raspbian 10 (Buster)
This tutorial is based on these instructions from Synology, with modifications because they didn’t work exactly as listed: https://kb.synology.com/en-uk/DSM/tutorial/How_to_access_files_on_Synology_NAS_within_the_local_network_NFS
Enable NFS on the Synology NAS:
From the Synology web interface, Go to Control Panel > File Services > NFS
Check Enable NFS Service. Set Maximum NFS Protocol to NFSv4.1 and click Apply.
Create NFS Permissions:
Still in the Synology web interface, go to Control Panel > Shared Folder
Select the folder you want to share and click Edit
Click NFS Permissions > Create
Enter a hostname or IP for the Raspberry Pi that will be accessing the folder.
Leave Privilege on Read / Write and leave other settings at default, and click Save.
Note the Mount path at the bottom of the folder edit page, then click Save again to save the folder settings.
Mount share on the Raspberry Pi:
From the terminal – install nfs if not already installed:
sudo apt update
sudo apt install nfs-common
Create the mount directory – change the path as appropriate:
sudo mkdir /mnt/share
Here’s where Synology instructions didn’t work. I kept getting a timeout error when trying to mount the share. This answer helped me get on the right track.
To do a one time mount to ensure everything is working – replace IP address/ hostname and paths are appropriate:
sudo mount -t nfs4 -o proto=tcp,port=2049 192.168.XX.XX:/volume1/share /mnt/share
To mount so it persists after a reboot (thanks to this article):
sudo nano /etc/fstab
Add this line to the bottom, again replacing ip addresses / hostname and file paths as needed:
I created this for part of a bigger project and figured it’d make a good generic template for any PowerShell script needing a basic menu using the up and down arrow keys and enter key to make a selection. For example data it lists the items in the root of the C: drive, but can easily be supplied any array of strings to list out in the menu. The chosen item is stored as a string in the $selection variable to be used later in the script.
<# Title: PowerShell Menu Template | Author: Michael Casey | Date: July 3rd, 2019 | Website: https://michael-casey.com/ #>

#Sample list data to populate menu:
#Set $List to any array to populate the menu with custom options
$List = Get-ChildItem -Path C:\ -Name

#menu offset to allow space to write a message above the menu
$xmin = 3
$ymin = 3

#Write Menu
Clear-Host
Write-Host ""
Write-Host "  Use the up / down arrow to navigate and Enter to make a selection"
[Console]::SetCursorPosition(0, $ymin)
foreach ($name in $List) {
    for ($i = 0; $i -lt $xmin; $i++) {
        Write-Host " " -NoNewline
    }
    Write-Host "   " + $name
}

#Highlights the selected line
function Write-Highlighted {

    [Console]::SetCursorPosition(1 + $xmin, $cursorY + $ymin)
    Write-Host ">" -BackgroundColor Yellow -ForegroundColor Black -NoNewline
    Write-Host " " + $List[$cursorY] -BackgroundColor Yellow -ForegroundColor Black
    [Console]::SetCursorPosition(0, $cursorY + $ymin)
}

#Undoes highlight
function Write-Normal {
    [Console]::SetCursorPosition(1 + $xmin, $cursorY + $ymin)
    Write-Host "  " + $List[$cursorY]
}

#highlight first item by default
$cursorY = 0
Write-Highlighted

$selection = ""
$menu_active = $true
while ($menu_active) {
    if ([console]::KeyAvailable) {
        $x = $Host.UI.RawUI.ReadKey()
        [Console]::SetCursorPosition(1, $cursorY)
        Write-Normal
        switch ($x.VirtualKeyCode) {
            38 {
                #down key
                if ($cursorY -gt 0) {
                    $cursorY = $cursorY - 1
                }
            }

            40 {
                #up key
                if ($cursorY -lt $List.Length - 1) {
                    $cursorY = $cursorY + 1
                }
            }
            13 {
                #enter key
                $selection = $List[$cursorY]
                $menu_active = $false
            }
        }
        Write-Highlighted
    }
    Start-Sleep -Milliseconds 5 #Prevents CPU usage from spiking while looping
}

Clear-Host
Write-Host $selection
#May use switch statement here to process menu selection
I’ve found too many times that I can sit in front of a computer screen for several hours without taking a break but that later in the day the eye strain catches up with me. I wanted something to remind me to take a quick break every 20 minutes, following the 20-20-20 rule. There’s a lot of programs that do something like this. Workrave may be the most popular, but I’ve had a few problems with it and decided I could probably do something simpler with a scheduled PowerShell script.
Notifications
First off, I need the notification. There’s a handful of blogs on how to make a toast notification in PowerShell. There’s a PowerShell module for it, but I’d rather not have to install an external module. From the creator of that module, here’s a working example of creating a toast notification in PowerShell:
This file contains hidden or bidirectional Unicode text that may be interpreted or compiled differently than what appears below. To review, open the file in an editor that reveals hidden Unicode characters. Learn more about bidirectional Unicode characters
I’m just going to copy what I need and modify and condense it. For more reading on toast notifications in PowerShell this blog article and this one provide more detail, but be sure to note that since they were published, it’s become necessary to use a real app id to get the notification to show – details here.
Here’s the selection of code I’m using for the notification.
Running this script will create the following notification:
VBS Launcher
The one problem with this is that when run through the task scheduler, a PowerShell console window will flash briefly before the notification displays. To avoid this intrusive popup, a short VBScript program can be used to launch the PowerShell script we’ve just created.
Launcher.vbs:
Dim shell,command
command = "powershell.exe -nologo -command ""C:\Scripts\Reminder.ps1"""
Set shell = CreateObject("WScript.Shell")
shell.Run command,0
Scheduling
The next step is to schedule this script to run and produce the notification every 20 minutes. This ended up being way more complex than I originally imagined. The parameters for New-ScheduledTaskTrigger don’t allow setting a RepetitionInterval with a Daily or AtLogOn parameter, which makes doing this a little tricky. In the end, I took some inspiration from this solution. The best solution simply seemed to be to set up the task I want in the Windows Task Scheduler GUI, export the XML, and then use that in the PowerShell script. At this point I’m not really doing much in PowerShell itself to create the task, however, ultimately this still creates a code-based solution that can easily be put into other scripts or run on a server without a GUI.
After creating the task in Windows Task Scheduler, I ran
Export-ScheduledTask "BreakReminder"
in PowerShell and get the following XML:
<?xml version="1.0" encoding="UTF-16"?>
<Task version="1.2" xmlns="http://schemas.microsoft.com/windows/2004/02/mit/task">
  <RegistrationInfo>
    <Description>A reminder every 20 minutes to take a 20 second break to prevent eye strain.</Description>
    <URI>\BreakReminder</URI>
  </RegistrationInfo>
  <Settings>
    <DisallowStartIfOnBatteries>false</DisallowStartIfOnBatteries>
    <StopIfGoingOnBatteries>true</StopIfGoingOnBatteries>
    <MultipleInstancesPolicy>IgnoreNew</MultipleInstancesPolicy>
    <IdleSettings>
      <StopOnIdleEnd>true</StopOnIdleEnd>
      <RestartOnIdle>false</RestartOnIdle>
    </IdleSettings>
  </Settings>
  <Triggers>
    <CalendarTrigger>
      <StartBoundary>2019-06-10T00:00:00</StartBoundary>
      <Repetition>
        <Interval>PT20M</Interval>
        <Duration>P1D</Duration>
        <StopAtDurationEnd>true</StopAtDurationEnd>
      </Repetition>
      <ScheduleByDay>
        <DaysInterval>1</DaysInterval>
      </ScheduleByDay>
    </CalendarTrigger>
  </Triggers>
  <Actions Context="Author">
    <Exec>
      <Command>C:\Scripts\Launcher.vbs</Command>
    </Exec>
  </Actions>
</Task>
I then squeezed that all into one line and end up with the following very messy lines of PowerShell code that can be used to create the task from scratch. The Reminder.ps1 and Launcher.vbs files from above just need to be saved somewhere and the file paths in Launcher.vbs and the below code need to be updated accordingly.
After having a couple sets of ink cartridges dry up on me after extended non-use, I learned that I’d need to print something regularly to keep my cheap inkjet printer working. After ignoring a few of my own reminders to print a test page manually, I decided to create an automated solution using a cron job on a Raspberry Pi I already have running on my home network.
To send the file to the printer, I used CUPS (documentation here or here). I followed the tutorial here to get it installed and activate the web interface.
With the printer added, I ran lpstat -p -d to get the exact name of the printer, then lp -d <printer> <file> to send a file to the printer.
To add the weekly cron job, I ran crontab -e and added the following line to get it to print weekly at noon on Sundays:
Add a blank file named ssh (with no file extension) to the boot drive to enable ssh. In Windows notepad or similar, save the file as “ssh” (with the quote marks) to avoid it adding a .txt file extension.
Insert the SD card to the Raspberry Pi, and plug in to power. Wait a few seconds, then use the Fing app to get its IP address on a home network, and use Putty to SSH in using default credentials of pi / raspberry.
Change the default password by running
passwd
Edit: Make Raspberry Pi Email You Its IP Address
As mentioned above, I’ve previously used the Fing app to find the IP address of the Pi on my home network. Recently, I’ve needed to access the Pi on a university network and wanted to do so without connecting it to a monitor and keyboard / mouse. Here’s a script to email the IP address of the Pi to myself every time it’s booted. Just modify the email and password (I’m using a secondary email account so I don’t care about the password being stored in plain text):
#pip install netifaces
import pip
def install(package):
if hasattr(pip, 'main'):
pip.main(['install', package])
else:
pip._internal.main(['install', package])
if __name__ == '__main__':
install('netifaces')

import smtplib
import netifaces as ni
import socket

ni.ifaddresses('wlan0')
ip = ni.ifaddresses('wlan0')[ni.AF_INET][0]['addr']
hostname = socket.gethostname()
message = hostname + "\n" + ip

fromaddr = 'myemail@gmail.com'
toaddrs = 'myemail@gmail.com'
username = 'myemail@gmail.com'
password = 'password'
server = smtplib.SMTP('smtp.gmail.com', '587')
server.ehlo()
server.starttls()
server.login(username,password)
server.sendmail(fromaddr, toaddrs, message)
server.quit()
Add the following to /etc/rc.local after the line “# By default this script does nothing.” and point it to the script you just saved:
sleep 20
python /path/to/script.py
If the SD card was previously used in a Raspberry Pi, the partitions will need to be merged again.
Open Disk Management.
Right click and select Delete Volume for both partitions on the SD card.
Right click and select New Simple Volume to create one partition for the whole SD card. Make sure the partition is FAT32. Win32DiskImager will create two partitions again, but this way it initially sees the whole SD card.
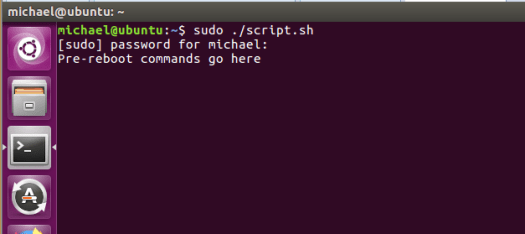
I needed to reboot in the middle of my shell script to install Kubernetes / Brigade, and my Googling found several people with similar questions, but no answers that quite worked for me. Here’s the basic code just to get a shell script to reboot and then resume in a visible terminal after the reboot.
The commands to be run after the reboot are echoed into a new shell script, so characters like slashes and dollar signs need to be escaped with a backslash.
Most of the posts with similar questions mentioned that running a shell script with sudo is a bad idea. Since my script is designed to be run in a sandboxed VM and most of the commands needed sudo permissions anyways, I figured it’s not a problem in this case.
#after reboot
echo "echo \"Post-reboot content goes here\"

#remove this from running at startup
rm ~/.config/autostart/myScript.desktop
rm /home/$SUDO_USER/myScript.sh" >> /home/$SUDO_USER/myScript.sh

#make file executable
chmod +x ~/myScript.sh

#set new script to run after reboot
cd .config/
mkdir -p "autostart/"
cd ..
echo "[Desktop Entry]
Type=Application
Exec=x-terminal-emulator -e sudo /home/$SUDO_USER/myScript.sh
Name=Testing" >> ~/.config/autostart/myScript.desktop

#before reboot
echo "Pre-reboot commands go here"
sleep 30

reboot -f
Many scripts require admin permissions, but remembering to right click and select “Run as Administrator” can be a pain. Fortunately, both batch and PowerShell scripts can written so that they’ll prompt for admin permissions if not run as an administrator. This won’t get around not having administrator permissions, but will save you a couple clicks every run by jumping straight to the UAC prompt.
Neither of these scripts are mine, but I’m documenting them here for my own quick and frequent reference.
CMD / Batch scripts:
::::::::::::::::::::::::::::::::::::::::::::
:: Elevate.cmd - Version 4
:: Automatically check & get admin rights
:: see "https://stackoverflow.com/a/12264592/1016343" for description
::::::::::::::::::::::::::::::::::::::::::::
 @echo off
 CLS
 ECHO.
 ECHO =============================
 ECHO Running Admin shell
 ECHO =============================

:init
 setlocal DisableDelayedExpansion
 set cmdInvoke=1
 set winSysFolder=System32
 set "batchPath=%~0"
 for %%k in (%0) do set batchName=%%~nk
 set "vbsGetPrivileges=%temp%\OEgetPriv_%batchName%.vbs"
 setlocal EnableDelayedExpansion

:checkPrivileges
  NET FILE 1>NUL 2>NUL
  if '%errorlevel%' == '0' ( goto gotPrivileges ) else ( goto getPrivileges )

:getPrivileges
  if '%1'=='ELEV' (echo ELEV & shift /1 & goto gotPrivileges)
  ECHO.
  ECHO **************************************
  ECHO Invoking UAC for Privilege Escalation
  ECHO **************************************

  ECHO Set UAC = CreateObject^("Shell.Application"^) > "%vbsGetPrivileges%"
  ECHO args = "ELEV " >> "%vbsGetPrivileges%"
  ECHO For Each strArg in WScript.Arguments >> "%vbsGetPrivileges%"
  ECHO args = args ^& strArg ^& " "  >> "%vbsGetPrivileges%"
  ECHO Next >> "%vbsGetPrivileges%"

  if '%cmdInvoke%'=='1' goto InvokeCmd

  ECHO UAC.ShellExecute "!batchPath!", args, "", "runas", 1 >> "%vbsGetPrivileges%"
  goto ExecElevation

:InvokeCmd
  ECHO args = "/c """ + "!batchPath!" + """ " + args >> "%vbsGetPrivileges%"
  ECHO UAC.ShellExecute "%SystemRoot%\%winSysFolder%\cmd.exe", args, "", "runas", 1 >> "%vbsGetPrivileges%"

:ExecElevation
 "%SystemRoot%\%winSysFolder%\WScript.exe" "%vbsGetPrivileges%" %*
 exit /B

:gotPrivileges
 setlocal & cd /d %~dp0
 if '%1'=='ELEV' (del "%vbsGetPrivileges%" 1>nul 2>nul  &  shift /1)

 ::::::::::::::::::::::::::::
 ::START
 ::::::::::::::::::::::::::::
 REM Run shell as admin (example) - put here code as you like
 ECHO %batchName% Arguments: P1=%1 P2=%2 P3=%3 P4=%4 P5=%5 P6=%6 P7=%7 P8=%8 P9=%9
 REM put remaining commands here
 cmd /k
The other day I needed to scan a small section of our network which uses static IP addresses rather than DHCP to see which assigned IP addresses actually correlated with a working device and which were no longer being used by an active device. Though there are plenty of fancy tools for this, due to the simplicity of what I wanted I figured it would be easier to throw together a quick PowerShell script than install and learn a third-party tool.
Here’s what I came up with:
$Failure = @() #initialize array

#pings IP addresses from 192.168.1.0 to 192.168.1.255
for ($i=0; $i -le 255; $i++)
{
	$IP = "192.168.1." + $i #append the iterator as the last byte of the IP address
	if(!(Test-Connection -ComputerName $IP -Quiet -Count 2)){ #if noting responds to the ping, add the IP address to an array
        $Failure += $IP
	}
}

Clear-Host

foreach ($site in $Failure) {
    Write-Host $site -ForegroundColor red #iterate through and write results from array
}
Note that this runs really slowly, but in this case there wasn’t any rush, so I could let it run in the background for a while.
This is a short but incredibly useful command line command I’ve found for pulling information on domain accounts in an Active Directory environment:
net user [username] /domain
The net user command is designed to create / update domain accounts, but in this form just displays a ton of info that can be useful to IT, like when a user’s password expires, what active directory groups they’re a member of, etc. There’s plenty of other commands to do similar things, but this one is an easy way to get a readout of a ton of information.
This is a simple but useful bit of PowerShell. Have you ever been waiting on a server to reboot and ended up pinging it or trying to start a remote desktop session several times before it’s back up and you can log in? This script pings a server (or any computer) every 15 seconds until the server responds, then starts a remote desktop session.
param ([Parameter(Mandatory=$true)][string]$URL)#get the parameter and set it as the variable $URL

While (!(Test-Connection -ComputerName $URL -Quiet -Count 1)) { #Loops until Test-Connection reaches the server and returns true. Only tries one ping at a time
	Start-Sleep -s 15 #pauses for 15 seconds. Easily editable to different time lengths
}

mstsc /v:$URL #starts a remote desktop session
To use it, just save and run the script, passing the hostname or IP address as a parameter:
And if you want it as a one-liner you can copy and paste rather than saving it, use the following and replace the IP address at the beginning with the target IP address or hostname:


 After the reboot:
